How To Install Ceiling Fan With Remote : How to Convert a Ceiling Fan to Remote Control - YouTube - Adding a ceiling fan to a room is a simple diy wi.. Of course, price of these ceiling fans is pretty high but so much worth the benefit. Getting started (0:00)installing the bracke. A remote can speed up or slow down the fan, turn the fan on and off or turn the lights connected to the ceiling fan on and off. Slide the canopy up to the ceiling. Insert batteries into the remote control.
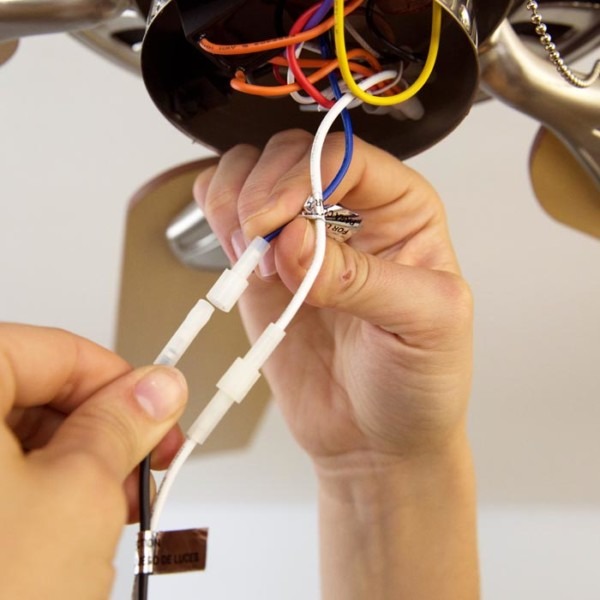
Insert batteries into the remote control. Identify the black and white wires on the remote receiver labeled for connection to the power source. Ceiling fan remote kit is here at amazon. Connect the three white wires from the ceiling, fan, and receiver together. One thing for sure, right when you think everything is created equal your find one that's a little different, and you managed to overcome this challenge, especially with the universal remote, which should be in fact universal, after all, it is just a transmitter and receiver operation with addressable.
How To Install a Ceiling Fan With Remote Control ... from www.electrical-online.com The installation of the fan is a prerequisite to use the remote. Follow this easy guide for how to install your hunter ceiling fan with light, with remote, and without the light. Turn the power to the electrical outlet box off. Program the ceiling fan remote after you've installed the receiver, insert batteries into the remote control. Of course, price of these ceiling fans is pretty high but so much worth the benefit. One thing for sure, right when you think everything is created equal your find one that's a little different, and you managed to overcome this challenge, especially with the universal remote, which should be in fact universal, after all, it is just a transmitter and receiver operation with addressable. As lots of complex ceiling fan wiring diagrams are available on the internet, we will try to show the very basic connections of fans with fuse box. Secure each blade to the fan with the old screws.
The wires from the ceiling fan unit then get connected to the controlled wires out of the receiver, white to white, black to black, and blue to blue.
Now we are ready to restore the power to the. So what we've done is we've selected a ceiling fan with a two wire wall control and we're going to go ahead and install the receiver module in the. Now install the light kit as per the instruction manual. Turn power back on and test. Then pack the wires into the center, making sure the wire nuts stay connected. How to install a ceiling fan with remote control you red wire ceiling fan with remote wiring diagram for mobile home schematics converting an existing ceiling fan to a remote control ceiling fan remote with 2 wires doityourself com community forums. Pair the receiver by powering on the fan and pressing the startup buttons according to the manufacturer's instructions. You can use a voltage meter to confirm the correct breaker was switched off and electricity is not flowing to any wires you'll be touching. Once the ceiling fan has been installed (guide is here) and tested by switching it on, turn to the remote and take its battery lid present at the back of the remote, out. Connect the red wire from the ceiling to the black wire in the fan. Hi russ, thanks for sharing about your successful ceiling fan remote installation. The first step when installing a ceiling fan with remote — or doing any home electrical work — is switching off the appropriate breaker on your circuit panel. Mount the protective globe, or dome, over the lights.
Nowadays, you can easily get a ceiling fan with light and a remote. So what we've done is we've selected a ceiling fan with a two wire wall control and we're going to go ahead and install the receiver module in the. And when it comes to your comfort zone, you will surely want it! Then pack the wires into the center, making sure the wire nuts stay connected. Now put the canopy in place and install the rest of the fan as per instructions provided.
How To Install Light Kit On Ceiling Fan from www.chanish.org Now we are ready to restore the power to the. Don't forget to put the cover in place when hanging the motor! Pull the fan's fan speed chain so that it is on high speed. A remote can speed up or slow down the fan, turn the fan on and off or turn the lights connected to the ceiling fan on and off. Once the ceiling fan has been installed (guide is here) and tested by switching it on, turn to the remote and take its battery lid present at the back of the remote, out. When referring to our ceiling fan installation guide, keep the following in mind: When you are putting in a ceiling fan with remote controls the first thing to do is put the receiver in the fan itself, but then you also need to install the. Cap off the black and white wire from the output side of the remote receiver module.
Getting started (0:00)installing the bracke.
Now install the light kit as per the instruction manual. This remote control ceiling fan switch will replace the existing light switch. Now put the canopy in place and install the rest of the fan as per instructions provided. So what we've done is we've selected a ceiling fan with a two wire wall control and we're going to go ahead and install the receiver module in the. Connect the red wire from the ceiling to the black wire in the fan. Adding a ceiling fan to a room is a simple diy wi. If pairing is not completed within 3 minutes, please turn power off and back on and repeat the pairing process. Insert batteries into the remote control. There is a remote inside the inner working of the fan, which responds to a remote control. Turn your fan on with your new remote control. The remote is manufactures to control a fan with an electrical source of ac 110/120v, 60hz. I want to install a ceiling fan that has a led light kit and an included remote control 2 different wall switches (one for fan and one for light). Identify the black and white wires on the remote receiver labeled for connection to the power source.
A remote can speed up or slow down the fan, turn the fan on and off or turn the lights connected to the ceiling fan on and off. Let us know how you can install it! The light, for example, may need to be on with the fan set to high. Align these with the black and white wires from the power source cable coming from the wall. Follow this easy guide for how to install your hunter ceiling fan with light, with remote, and without the light.
How to Install a Ceiling Fan Remote | Ceiling fan with ... from i.pinimg.com Don't forget to put the cover in place when hanging the motor! Ceiling fans are developing in technology and providing many exciting features with passing days. Now put the canopy in place and install the rest of the fan as per instructions provided. Now when one switch is on, the remote will control the light. Slide the canopy up to the ceiling. The installation of a regular ceiling fan won't be enough with one that includes a remote control. Connect corresponding wires from fan to remote (white to white, black to black, blue to black and green/copper to green/copper). Once you have the fan mounted and in place, slide the ceiling fan remote receiver into the space above the down rod.
As lots of complex ceiling fan wiring diagrams are available on the internet, we will try to show the very basic connections of fans with fuse box.
The installation of a regular ceiling fan won't be enough with one that includes a remote control. One thing for sure, right when you think everything is created equal your find one that's a little different, and you managed to overcome this challenge, especially with the universal remote, which should be in fact universal, after all, it is just a transmitter and receiver operation with addressable. And when it comes to your comfort zone, you will surely want it! The remote is manufactures to control a fan with an electrical source of ac 110/120v, 60hz. Now install the light kit as per the instruction manual. Getting started (0:00)installing the bracke. Align these with the black and white wires from the power source cable coming from the wall. Before cutting the power, though, set the light and fan as indicated by the instructions. Cap off the black and white wire from the output side of the remote receiver module. There is a remote inside the inner working of the fan, which responds to a remote control. Slide the canopy up to the ceiling. The first step when installing a ceiling fan with remote — or doing any home electrical work — is switching off the appropriate breaker on your circuit panel. It is time to complete the final touches on our ceiling fan installation.